• Docs
  • Changelog
Sign in
Get started
    • Home
    • Your first deploy
    • Free instances
    • Platform features by plan
    • Use with coding agents
    • FAQ
    • Templates
      • Migrate from…
        • Heroku
        • Railway
    • Compute plans
    • SandboxesBeta
      • Service types
        • Which to use?
        • Static sites
        • Web services
        • Private services
        • Background workers
        • Cron jobs
        • Workflows
        • Multi-service architectures
      • Data storage
        • Render Postgres
        • Render Key Value (Redis®-compatible)
        • Persistent disks
    • How deploys work
    • Supported languages
    • Git providers (GitHub, etc.)
    • Build pipeline
    • Deploy hooks
    • Monorepo support
    • Troubleshooting deploys
      • Previewing changes
        • Single-service previews
        • Preview environments (multi-service)
      • Docker deploys
        • Overview
        • Deploy a registered image
        • Using secrets
      • Runtime
        • Native runtimes
        • Environment variables & secrets
        • Default environment variables
    • Intro to sandboxes
    • Limits
      • How to…
        • Create & configure sandboxes
        • Execute commands
        • Manage files
        • Manage snapshots
      • Use with…
        • Claude Managed Agents
        • Cursor Cloud Agents
        • OpenAI Agents API
      • SDK/CLI reference
        • TypeScript SDK
        • Python SDK
        • CLI commands
    • Intro to workflows
    • Tutorial
    • Limits & pricing
      • How to…
        • Define tasks
        • Define flowsNew
        • Trigger runs
        • Develop locally
      • SDK reference
        • TypeScript SDK
        • Python SDK
      • Example workflows
        • TypeScript examples
        • Python examples
    • Overview
    • Create & connect
    • Database credentials
    • Extensions
    • Version upgrades
    • Logical replication
    • Legacy instance types
      • Database recovery
        • Recovery & backups
        • High availability
      • Database performance
        • Read replicas
        • Connection pooling
        • Admin apps
        • Repacking tables
        • Troubleshooting performance
    • Regions
    • Inbound IP rules
    • Edge caching
    • WebSockets
    • TLS certificates
      • Custom domains
        • Overview
        • Cloudflare
        • Namecheap
        • Other DNS providers
      • Internal traffic
        • Private network
        • Private links
      • Outbound traffic
        • Default IP ranges
        • Dedicated IP addresses
        • Outbound bandwidth
        • Handling network changes
      • Static site config
        • Custom response headers
        • Redirects & rewrites
    • The Render Dashboard
    • SSH / Shell access
    • Projects & environments
      • Service actions
        • Scaling
        • Rollbacks
        • Maintenance mode
        • One-off jobs
      • Infrastructure as code
        • Blueprints overview
        • render.yaml reference
        • Terraform provider
    • In-dashboard metrics
    • Health checks
    • Uptime best practices
      • Logging
        • In-dashboard logs
        • Log streams (syslog/HTTPS)
      • OpenTelemetry (OTel) metrics
        • Provider setup
        • Metrics reference
      • Notifications
        • Webhooks
        • Email / Slack
    • MCP Server
      • Render CLI
        • Overview
        • Command reference
      • REST API
        • Overview
        • API reference
      • Third-party connections
        • OIDC support
        • Datadog
    • Workspaces, members, & roles
    • Login settings
    • Audit logs
      • Organizations
        • Overview
        • SAML SSO
    • DDoS protection
    • Platform maintenance
      • Compliance
        • Overview
        • HIPAA (US health data)
        • HIPAA best practices
        • Shared responsibility model
        • Pentest policy
    • Heroku vs Render
    • Vercel vs Render

Configuring Cloudflare DNS

This guide assumes you've already added a custom domain from Cloudflare to your service in the Render Dashboard. If you haven't done this yet, first read Custom Domains.

Common setup

Most commonly when setting up a Cloudflare custom domain, you add a CNAME record for the root domain, along with another for the www subdomain.

Remove all AAAA records for your domain if it has any. AAAA records map a domain to a corresponding IPv6 record, but Render does not yet support IPv6 addresses. As a result, AAAA records can interfere with your custom domain's behavior on Render.

  1. Log in to your Cloudflare dashboard and select your domain from the Home page to open its settings.

  2. Navigate to SSL/TLS > Overview. Set your encryption mode to Full:
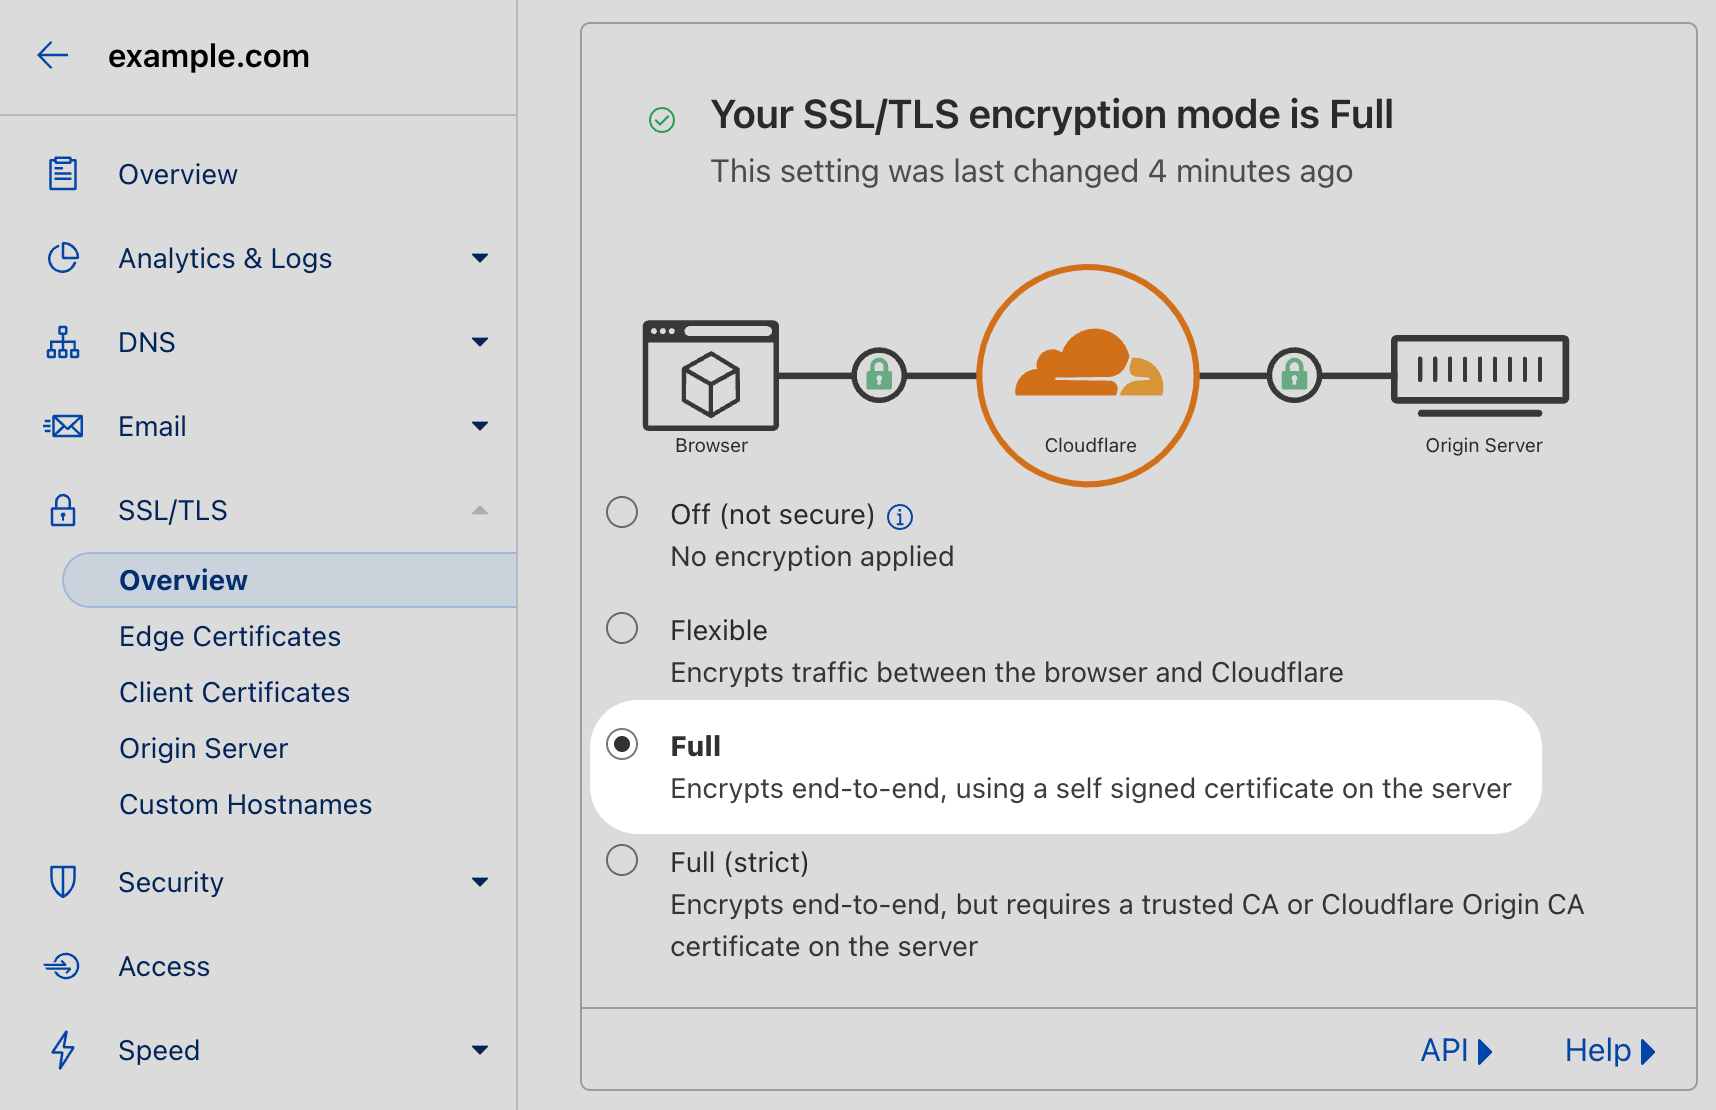
    Cloudflare SSL/TLS settings

  3. Navigate to DNS > Records and click Add record.

  4. Create a new CNAME record that points to your Render service's onrender.com subdomain (obtain this value in the Render Dashboard):
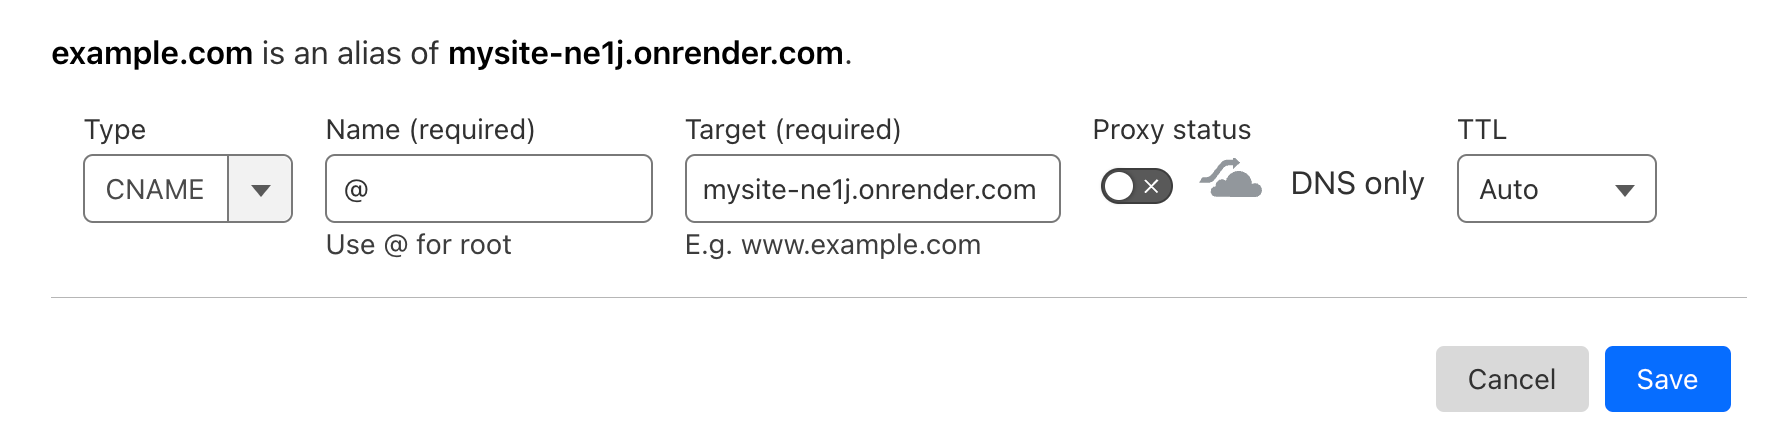
    Cloudflare Root CNAME Addition

    • Set Name to @ to specify your root domain (next you'll add a separate record for www).
    • Set Target to your Render service's subdomain (e.g., example.onrender.com).
    • Set Proxy status to DNS only. This ensures that requests go to Render instead of Cloudflare, so that we can verify the domain and issue a certificate.

    Click Save.

  5. Repeat the previous step to create a second CNAME record.

    • This time, set Name to www and provide the same values as before for Target and Proxy status.

    Click Save.

  6. Your completed configuration should resemble this:

    Cloudflare DNS records with two CNAME records

That's it! DNS changes might take a few minutes to propagate, after which your domain points to your Render service. You can check the status of your service's certificates and manually request verification in the Render Dashboard under Custom Domains:

Verified certificates in the Render Dashboard

After the Render Dashboard indicates that your certificates are issued and valid, you can optionally set Proxy status to Proxied for your CNAME records.

Adding a wildcard custom domain without the base domain

Your Cloudflare domain requires some additional configuration if all of the following are true:

  • You're adding a wildcard custom domain (e.g., *.example.com) to your Render service.
  • You are not adding the corresponding base domain (e.g., example.com) to your service.
  • You've enabled proxying for your base domain (i.e., Proxy status is set to Proxied).

Origin override with a Cloudflare Worker

To direct wildcard traffic to Render while directing base domain traffic elsewhere, you can use a Cloudflare Worker to perform an origin override.

The instructions below assume the following:

  • You have the custom Cloudflare domain example.com.
  • You want your Render web service example.onrender.com to serve traffic for *.example.com
  • You want base-domain-origin.com to serve traffic for example.com.

1. Add a DNS record pointing to base-domain-origin.com

Cloudflare Base Domain DNS Record

2. Create a Worker

  1. Navigate to Workers -> Overview -> Create Service

  2. Name your service base-domain-override, select HTTP Handler, and click Create service
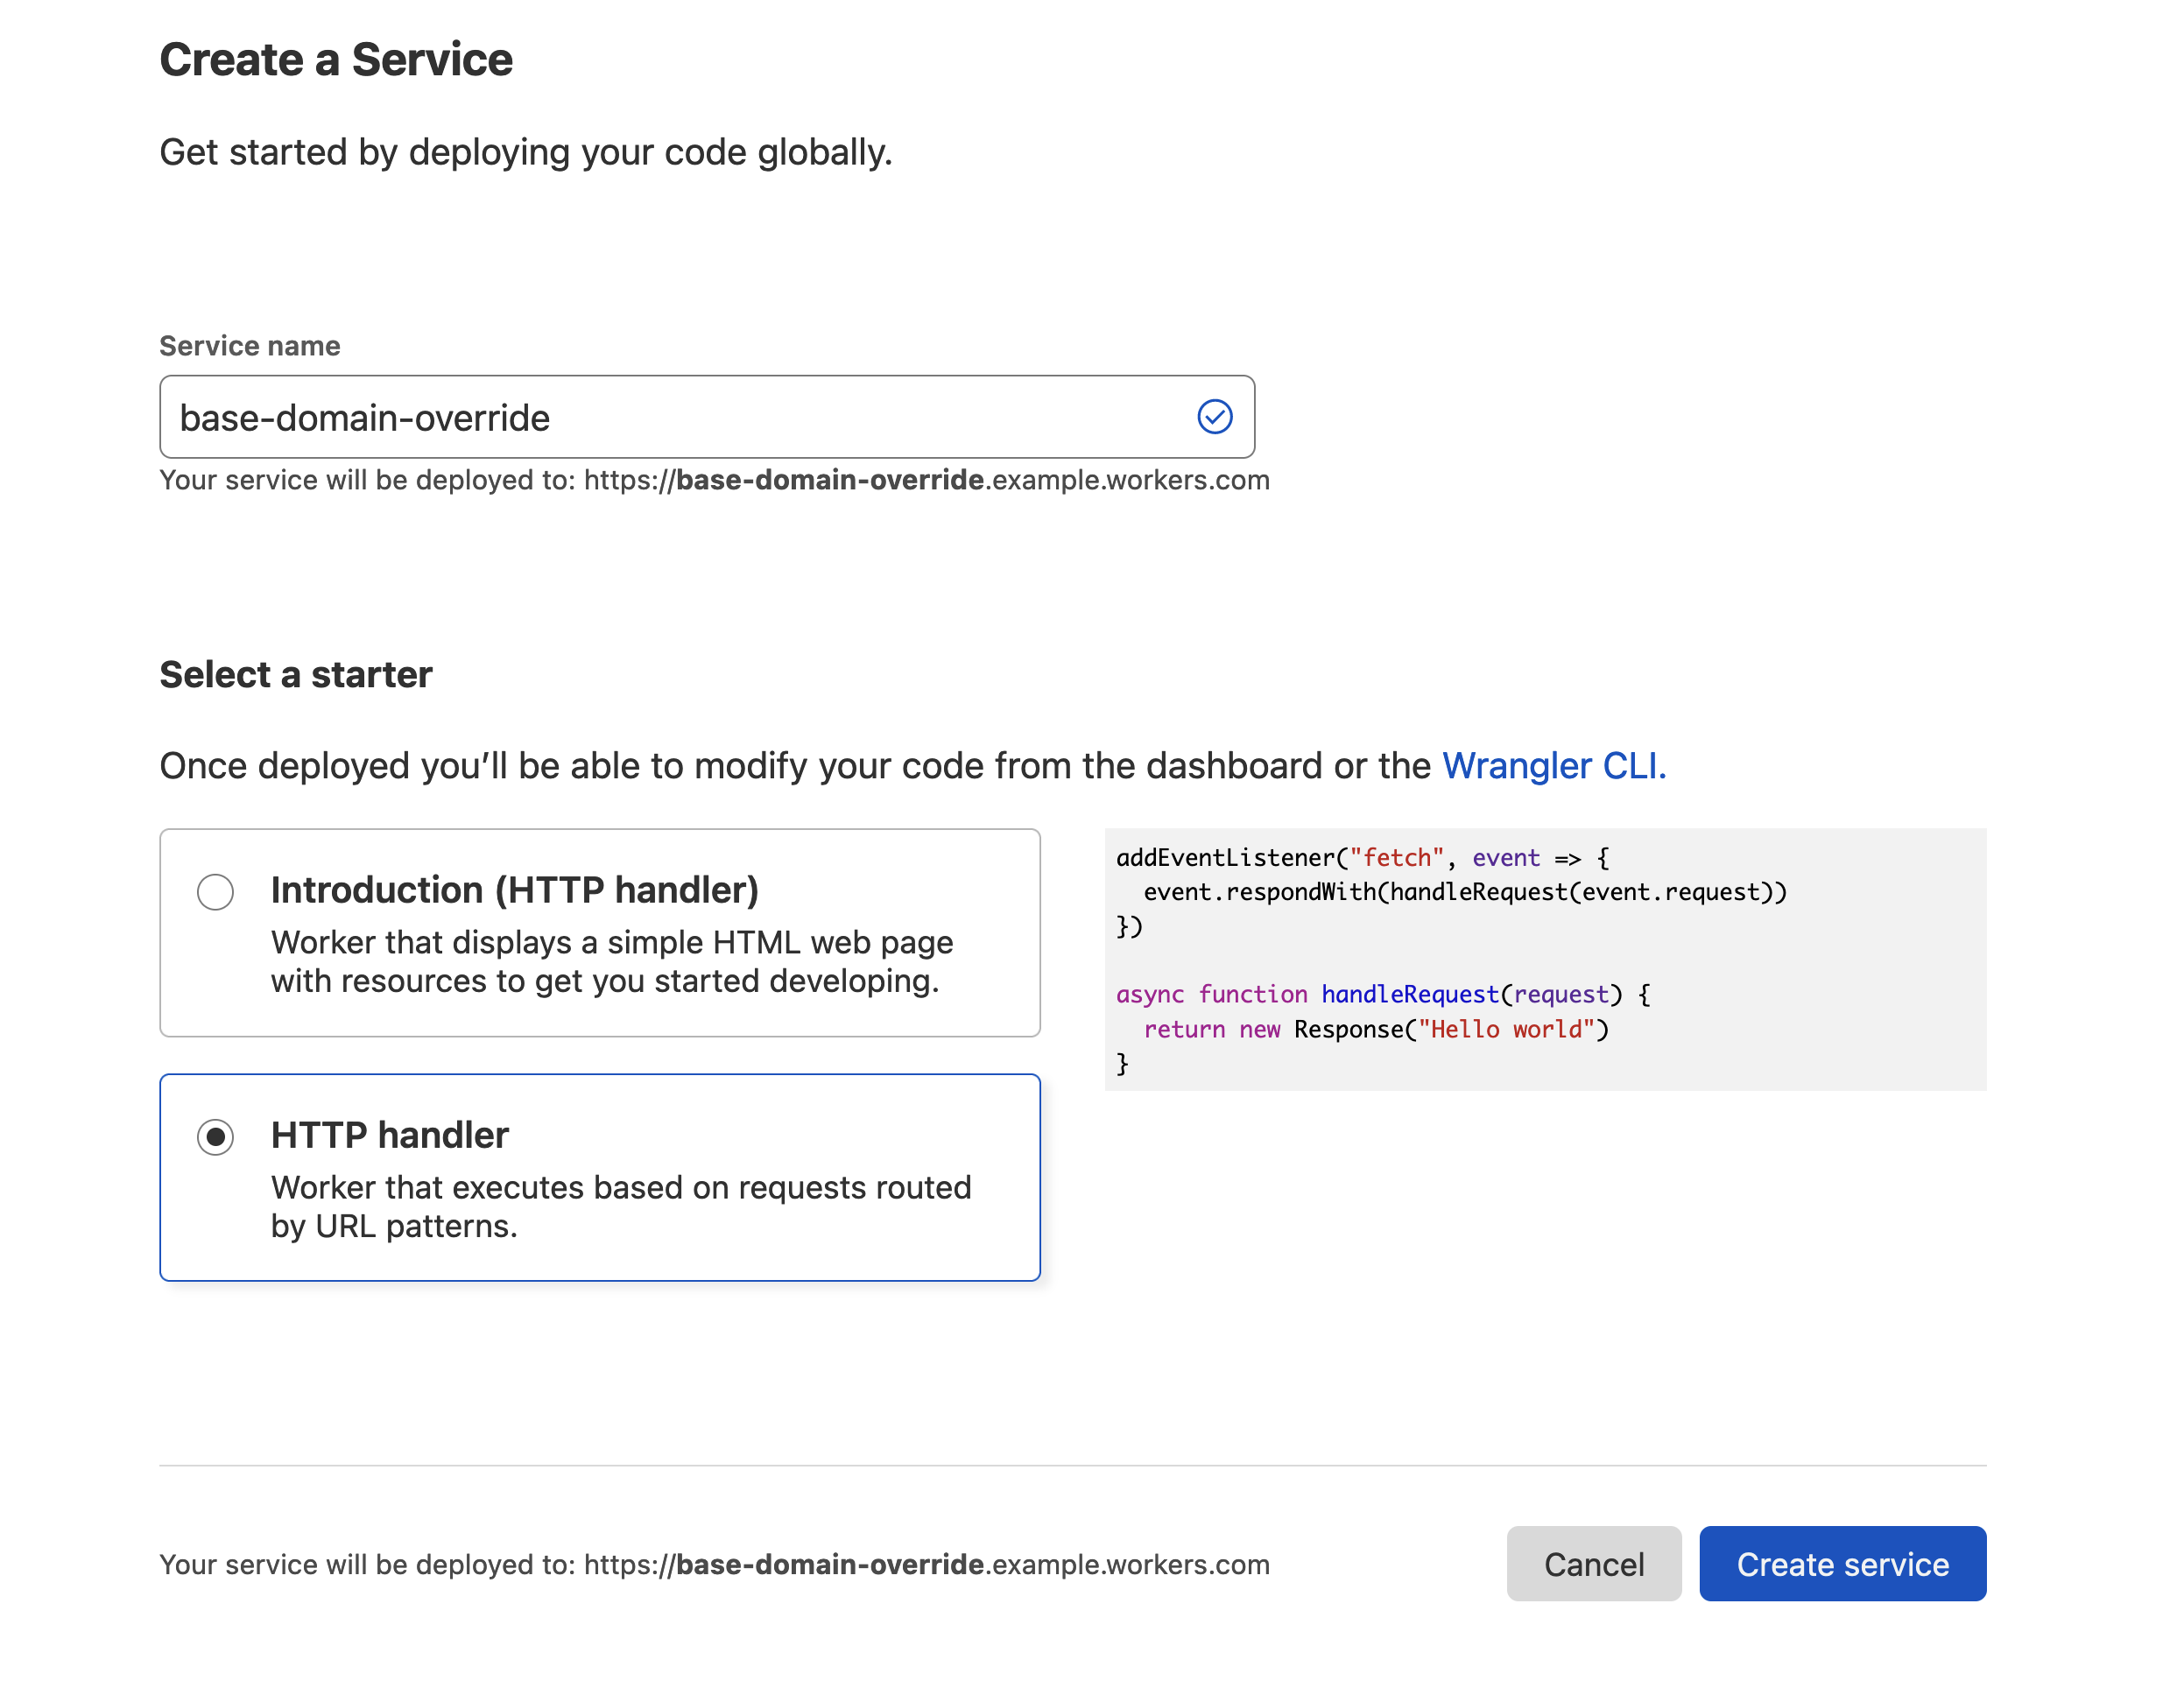
    Cloudflare Create a Service

  3. Scroll down and click Quick Edit.

  4. Add the following configuration. Replace example.com with your custom domain and make sure the base-domain-origin subdomain matches the DNS record you created in the first step.
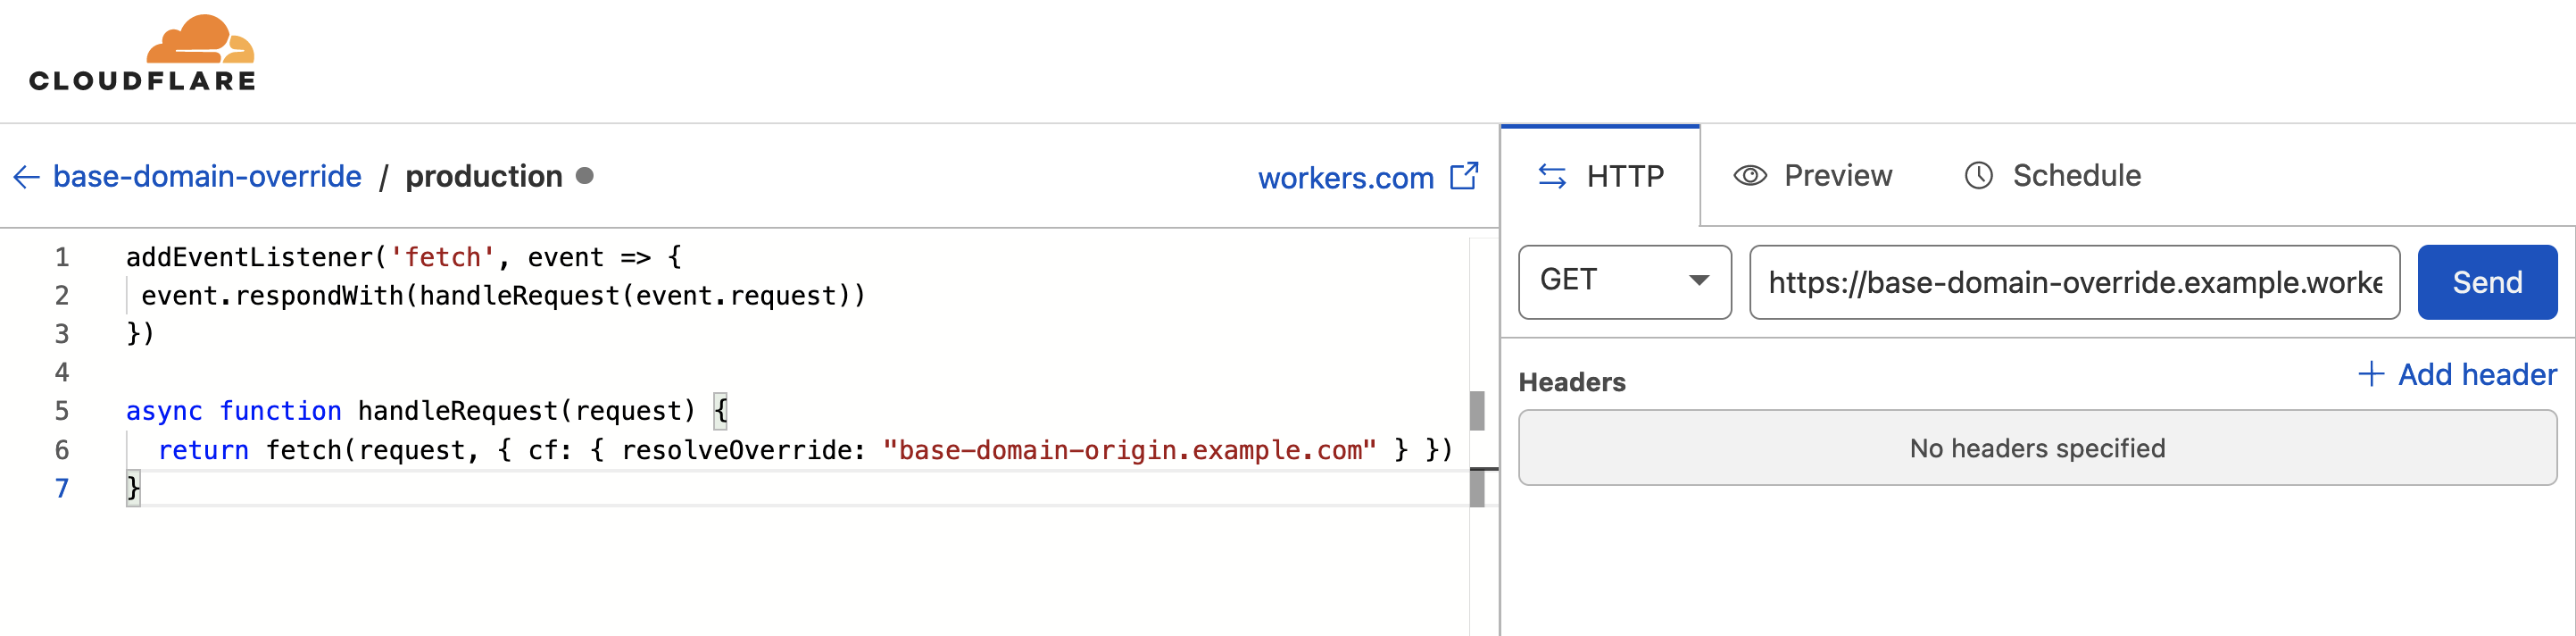
    Cloudflare Worker Configuration

  5. Click Save and Deploy -> Navigate back to the Worker overview page -> Click Triggers -> Add Route

  6. Add a route matching your base domain and click Add Route:
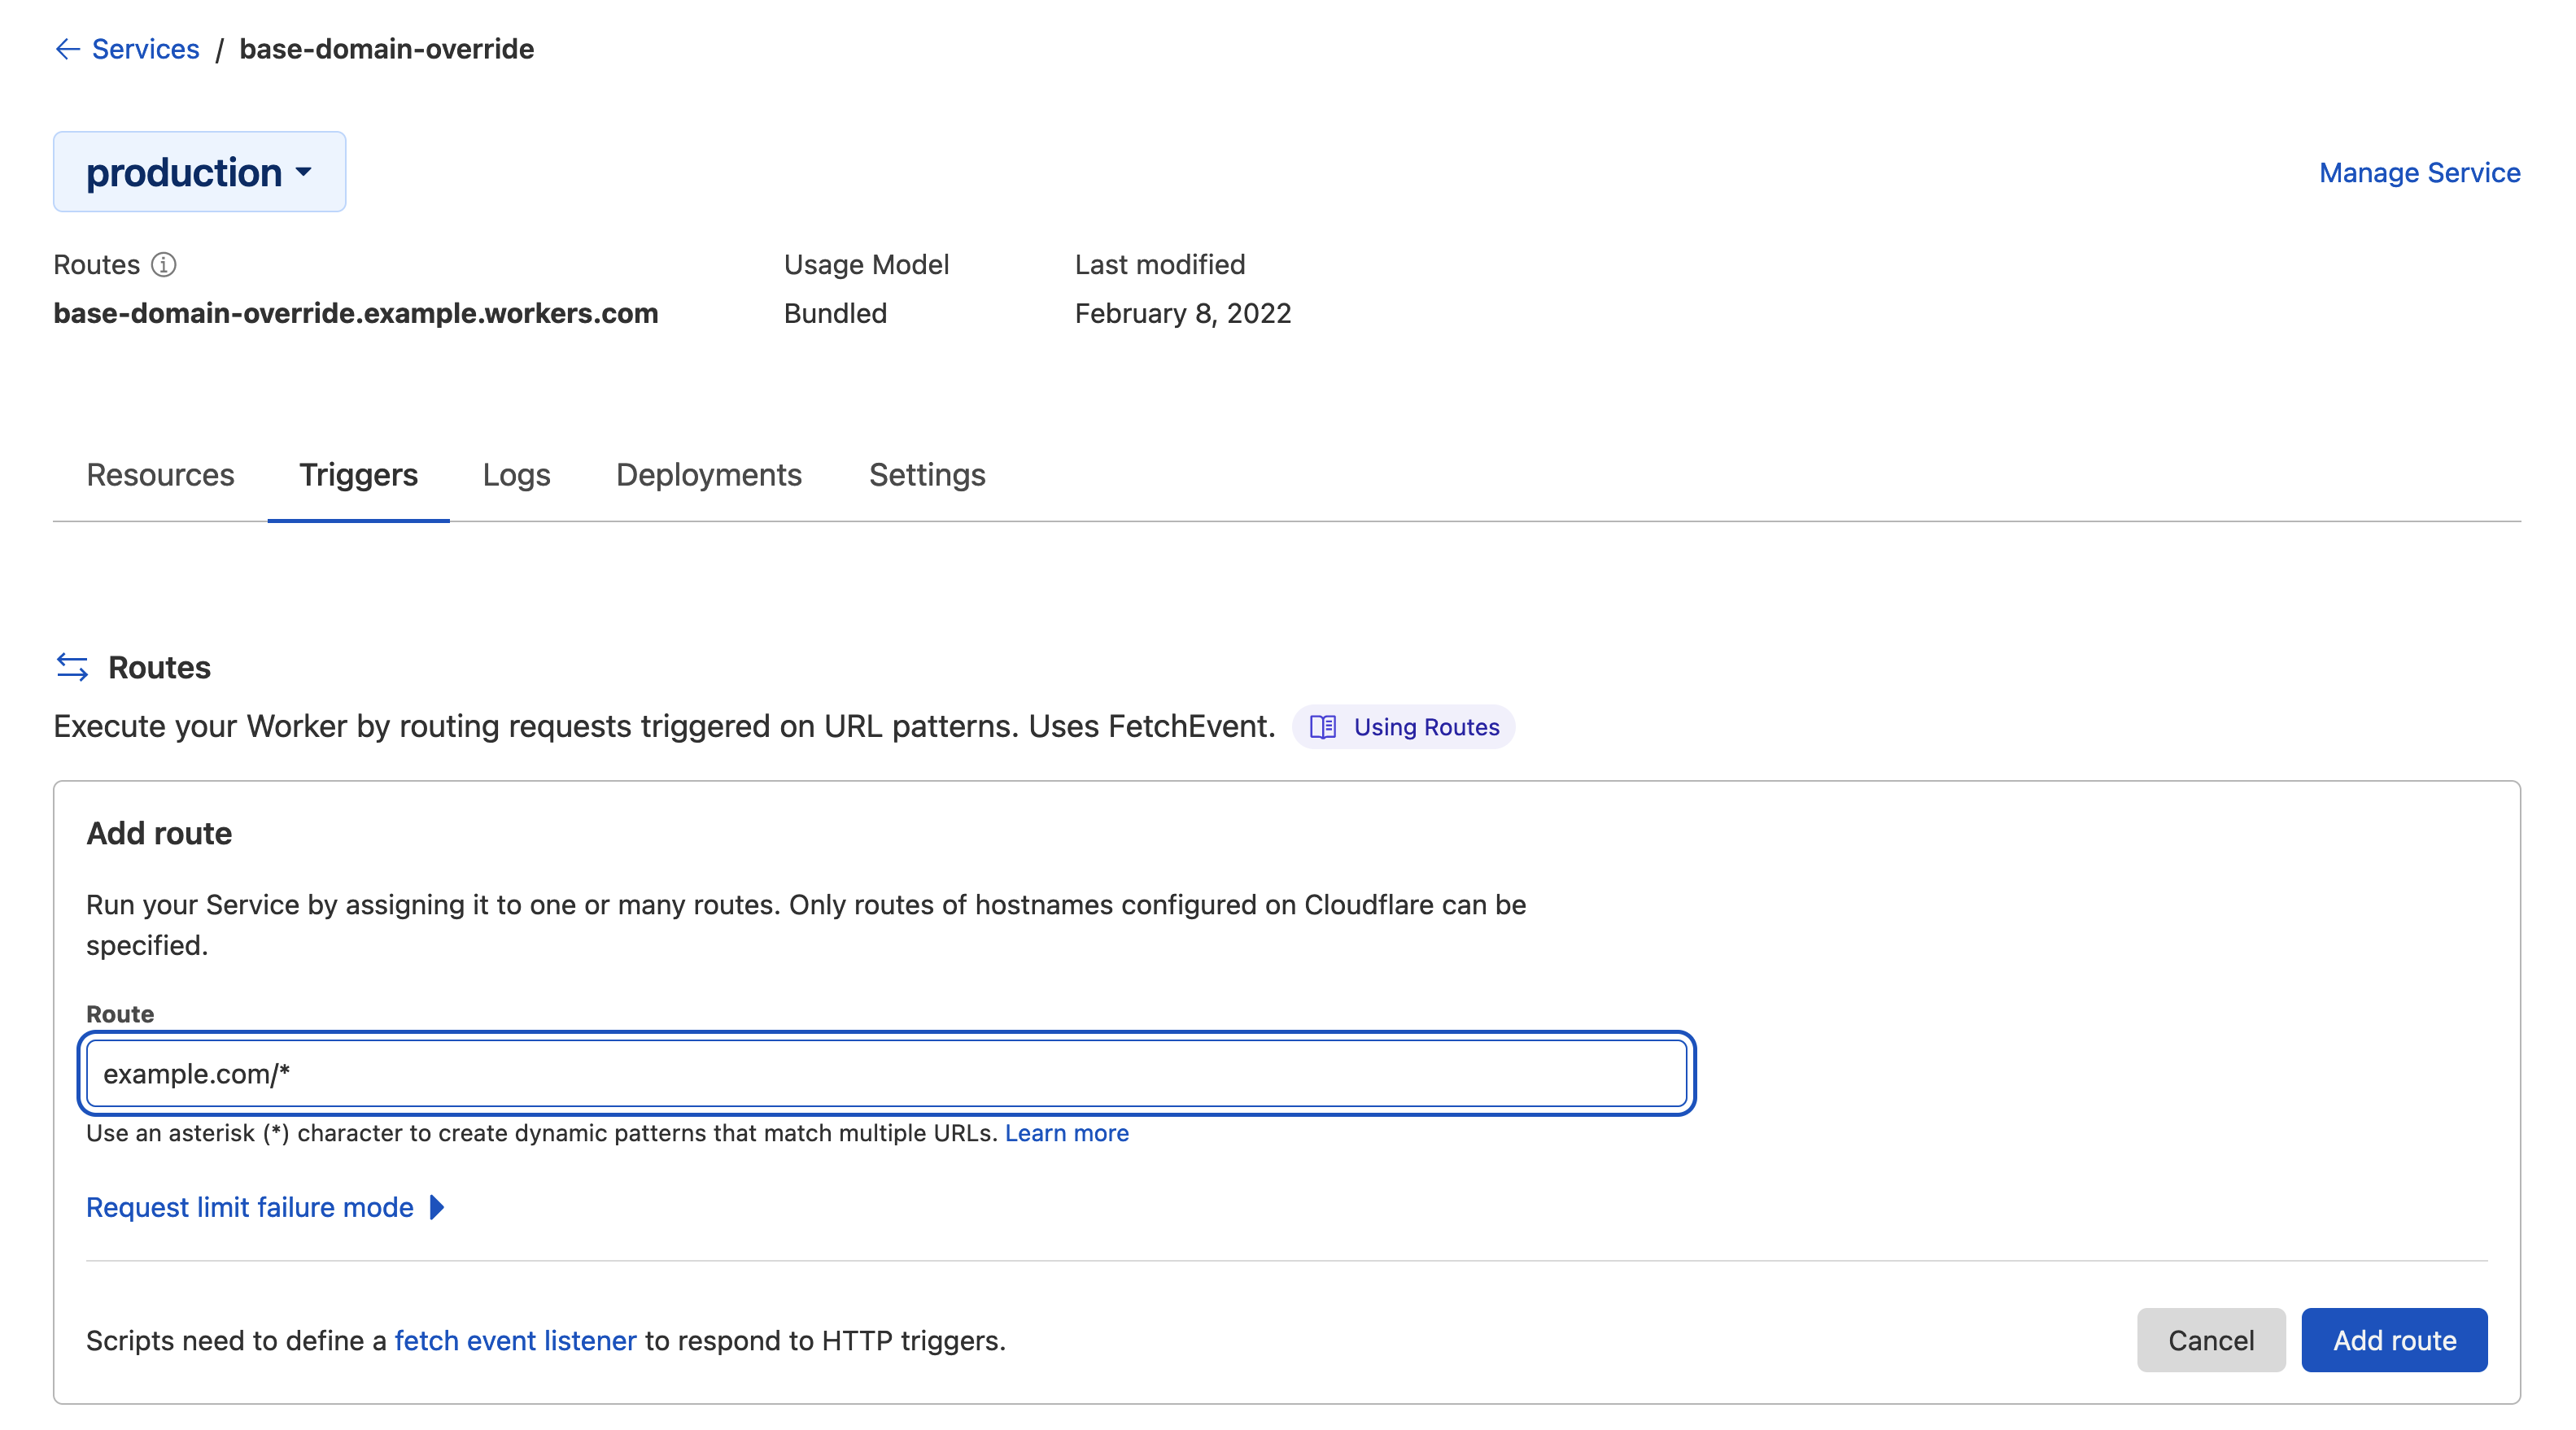
    Cloudflare Triggers

  7. Finally, add CNAME records for both your base domain and wildcard domain pointing to your onrender subdomain. Pointing your base domain to Render is required for an orange to orange setup. With this configuration, Cloudflare will send traffic to your zone first. The Worker that you just set up will match the route and trigger an origin override, so traffic for the base domain will not get sent to Render. If you do not do this, Cloudflare will send the traffic directly to Render's zone and the Worker you set up will have no effect.

Cloudflare DNS Records

Your wildcard traffic should now be directed to Render and your base domain traffic directed to the origin you specified. If you have any questions, you can get in touch with us at support@render.com.

Configuring Cloudflare DNS
  • Common setup
  • Adding a wildcard custom domain without the base domain
    • Origin override with a Cloudflare Worker
All Systems Operational
© Render Inc. All rights reserved.